Saturday, December 29, 2012

Egg Rolls

My favorite blog lately has been Mel's Kitchen Cafe.  I don't think this is the first time I've mentioned this lovely little blog.  There are so many fantastic recipes and last night I might have spent a sizeable chunk of time laying in bed and reading recipes online.  Man, I love Christmas break!   

I made these tonight and they did not disappoint.  I made a few little adjustments and will most definitely be making them again. 

The recipe below made about 50 egg rolls.  I made some to take to a post-Christmas get together tomorrow.  I rolled them and stuck them in the fridge.  I'll fry them up tomorrow before the party.  I also fried and then froze some.  The frozen ones reheated nicely.  Put them in a 350 degree oven for 20-25 minutes.    

** Update & LESSON LEARNED:  When I went to fry the egg rolls that had been in the fridge overnight, they were really delicate and some fell apart while cooking.  It was pretty frustrating.  I will not be going this route in the future!  You can refrigerate or freeze the filling, but once wrapped, I would suggest cooking them before they sit for too long.   

 
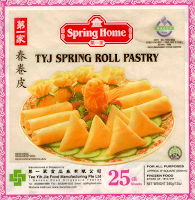
SUPER IMPORTANT NOTE:  Using the right kind of wrapper is uber important here.  Typically egg rolls are made using wonton wrappers which can be a little on the heavy side.  This recipe suggests using spring roll pastry (specifically Spring Home brand) which make them a little lighter and crispier.  I found these, along with several of the other ingredients, at Uwajimaya, the Asian grocery store in Bellevue (for Seattle folks).  They are in the frozen section.  They only had one package so I also used Lumpia (Filipino egg roll) wrappers that I found at the regular grocery store.  I preferred the spring roll pastry because it had a little more stretch to it, but the lumpia wrapper ended up being a good substitute.  This is what the spring roll pastry and vermicelli look like:


I also realized that I put twice the amount of sauce that I was supposed to, but it tasted just fine to me so I'm editing this recipe to be a little saucier than the original. 


EGG ROLLS

  • 50 sheets spring roll pastry
  • sweet chili sauce for dipping (from Trader Joe's, this is KEY!)
Filling:
  • 2 ounces vermicelli (mung bean thread noodles) noodles
  • 2 pounds ground pork (you can use a combo of pork and ground turkey if you so desire)
  • 1/2 head of cabbage, shredded finely
  • 2 whole eggs
  • 2 egg whites (save the egg yolks for sealing the egg rolls)
  • 10 ounces shredded carrots
  • 1 onion, finely chopped (use the food processor to get the onion minced, if you want)
Sauce:
  • 2 tablespoons salt
  • 8 tablespoons oyster sauce
  • 4 tablespoons black soy sauce (or regular soy)
  • 1 tablespoon black pepper
  • 2 tablespoons fish sauce

Put the vermicelli noodles in a large bowl and pour hot water over noodles and let soak for 15-20 minutes.


Once soaked, drain well and chop noodles up a bit into 2-3 inch pieces.


Mix all the filling ingredients (noodles, meat, cabbage, whole eggs, egg whites, carrots and onions) in a LARGE bowl. Use your hands to mix well. 


NOTE:  I used the biggest bowl I have and it still was a little tricky so I mixed in two batches. 


Mix sauce ingredients in a small bowl and add to filling.  Mix well. 


Pull apart spring roll pastry wraps.


** Leave main stack of wraps covered with a damp towel while rolling egg rolls.


Lay the wrap so it is a diagonal in front of you.  Put a large spoonful of filling about an inch above the bottom diagonal. Fold up the bottom triangle and tuck under the filling then proceed to roll up the egg roll, folding in the sides and tucking them in.


Moisten the top triangle with the remaining egg yolks (I used a silicone brush for this) and roll/press to seal.


Heat 1-2 inches of canola or vegetable oil to 375 degrees.


Fry egg rolls until golden brown and cooked through. Constantly turn the egg rolls so they don’t overcook on one side.


Drain on paper towels and serve with sweet chili sauce.


Source:  Mel's Kitchen Cafe

Thursday, December 27, 2012

Pretzel "Salad"

It's pretty hard to justify that this is a salad, hence the quotation marks. I'd definitely say it's a dessert considering it has sugar in all three layers. Either way, it's delicious.  It's salty, sweet, a touch tart, fluffy, and yummy.   

I made this "salad" for Christmas dinner this year.  For the last several years, per my sister-in-law's idea, we've had a very casual Christmas day dinner. We do fancy on Christmas Eve (ham, turkey, all that jazz) and down home comfort foods on Christmas day.  We usually have pulled porked sandwiches with cole slaw (made by my SIL) and other yummy fixings.  It's nice to have a laid back, low key Christmas day with a nap or two squeezed in.  I didn't get out of my pajamas this year, which worked well since I stuffed my face with pulled pork and Jell-o salad that's really a dessert, not a salad.  Stretchy pants are the way to go in such cases!  


 PRETZEL SALAD   
  • 2 cups crushed pretzels (I use the food processor for this.)
  • 3/4 cup melted butter
  • 3 tablespoons sugar, plus 1 cup sugar
  • 1 (8 ounce) package cream cheese, softened
  • 1 1/2 cups whipping cream, whipped
  • 1 (6 ounce) package raspberry or strawberry Jell-o gelatin
  • 2 cups pineapple juice
  • 20 ounces frozen raspberries or strawberries

Preheat oven to 400 degrees and spray the bottom of a 9 x 13 pan. 


For the crust, mix the pretzels, butter, and 3 tablespoons of sugar.


Press this mixture into the pan and sprinkle with 1 tablespoon of additional sugar.  This will help form a crust and prevent the pretzel layer from getting soggy.


SIDE NOTE:  Do you have a tart tamper?  I really love mine and think it's a pretty essential kitchen gadget.  It makes jobs like pressing the crust into a pan so much easier.  Maybe you should get one if you don't already have one.   


Bake for 7 minutes.  Set aside and allow to cool.


In a mixing bowl, beat together softened cream cheese and 1 cup of sugar.


Fold in whipped cream and spread over the cooled crust.


NOTE:  Be sure to spread the cream cheese mixture all the way to the edges of the pan to prevent the Jell-o from seeping down and making the crust soggy. 


Refrigerate until well chilled.


Heat the pineapple juice in the microwave and then add the gelatin. 


Dissolve and allow to cool slightly. 


Add the raspberries and allow the mixture partially set before pouring over the cream cheese mixture.


NOTE:  I put the frozen raspberries in the food processor and pulsed it a few times so the berries were a little less chunky. 


Refrigerate until serving time.


Source:  slighly modified from Paula Deen, Food Network

Sunday, December 23, 2012

Muddy Buddies

This is a good ol' classic.  I'd forgotten how delish it is until I made it for my kids at school a while back.  There's something very addictive about this little peanut buttery-chocolate-crunchy mixy mix. 


 MUDDY BUDDIES
  • 9 cups Chex cereal (I like to use rice Chex.)
  • 1 cup semisweet chocolate chips
  • 1/2 cup peanut butter
  • 1/4 cup butter
  • 1 teaspoon vanilla
  • 1 1/2 cup powdered sugar

Measure cereal into large bowl. (I use the biggest bowl I have. It makes mixing much easier.)


In bowl, microwave chocolate chips, peanut butter, and butter for 1 minute. Stir.


Microwave for 15-30 more seconds and stir until smooth.


Add vanilla to chocolate mixture.


Pour mixture over cereal and mix until well coated.


Add powdered sugar and mix well.


NOTE: You can put the mixture into a plastic bag and add the powdered sugar and shake. I feel like this can easily be done in the bowl instead.


Spread on wax paper and cool.


Source:  Chex Website

Thursday, December 20, 2012

Peppermint Pie

I had some leftover Trader Joe's Candy Cane Joe-Joes and wanted to make something festive.  This is what happened: Candy Cane Joe-Joe crust, thin layer of ganache, chocolate silk pie filling, peppermint fluff, topped with crushed candy canes!!  I combined a few things that I love to make up this little number that I will call peppermint pie.  I'm not really sure that it's a pie, but don't know what else to call it.  I made it in a springform pan and like the way it looked when finished.  You could definitely make it in a pie pan if you don't have a springform.  I'm going to make it again for Christmas Eve and can't wait to enjoy the fluffy goodness.   

This was really easy, but just a little time consuming because it needs time to freeze and set up.  The nice thing is you can make it ahead of time.


PEPPERMINT PIE

Before starting, line the sides of a spring form pan with foil.  This will make removing the pie in the end easier and less messy. 


CRUST
  • 2 cupsTrader Joe's Candy Cane Joe-Joe crumbs (about 20 cookies)
  • 3 tablespoons butter, melted

Combine cookie crumbs and melted butter.


Press into the bottom of a spring form pan. 


Bake at 350 degrees for 10 minutes. 


GANACHE
  • 1/2 cup cream
  • 3 ounces semisweet chocolate, chopped

Pour 1/2 cup cream in a small saucepan and heat over medium heat until simmering.


Pour the hot cream over the chopped chocolate and set aside (without stirring) for 3-5 minutes.


Whisk until combined and glossy smooth. Cool the ganache to room temperature by whisking quickly for a few minutes.


Spread the ganache over the bottom and place in the freezer while you make the next layer. 


CHOCOLATE SILK PIE
  • 1/2 cup butter
  • 3/4 cups sugar
  • 6 tablespoons cocoa
  • 2 tablespoons vegetable oil
  • 1 teaspoons vanilla
  • 2 large eggs

Combine butter, sugar, cocoa, and oil in a mixer and beat for a signficant amount of time.


NOTE: The sugar will not be dissolved yet. Don't be alarmed.


Add vanilla and eggs, one at a time. Beat well after each egg and scrape the bowl several times.


Mixture will get lighter and fluffier as you continue to beat.


Add mixture on top of the set ganache and smooth evenly. 


Place in freezer for several hours. 


PEPPERMINT FLUFF
  • 1 (13 ounce) bottle marshmallow cream
  • 1/4 cup milk
  • 1/2 teaspoon peppermint extract OR 1/8 teaspoon peppermint oil
  • 2 cups whipping cream, whipped
  • 1-2 candy canes, crushed

Mix together marshmallow cream and milk using a whisk.  (It takes a while to incorporate the milk into the blob of marshmallow cream.  Stick with it, it'll eventually come around.)


Add peppermint oil.


Fold in whipped cream.


Spread mixture on top of frozen chocolate silk pie.


Sprinkle crushed candy canes on top.


Return to the freezer and freeze for several more hours. 


Let sit out for a few minutes before cutting and serving.


Remove spring form pan and foil from sides. 


Cut into generous slices. 


Source:  Megan Porter

Tuesday, December 11, 2012

Potato Latkes

In 2nd grade right now we're reading a bunch of books about different winter holidays.  Every time I read, "Latkes, latkes good to eat, cook me up a Hanukkah treat!" I think to myself that I should do that.  Tonight I did.  Potato pancakes.  Mmmmmmm.  Potatoes, onions, oil, and salt.  So simple, so delicious.


POTATO LATKES
  • 2 pound potatoes
  • 1 cup finely chopped onion
  • 2 large eggs, lightly beaten
  • 1 teaspoon salt
  • oil for cooking

Preheat oven to 250 degrees.  


Peel potatoes and grate by hand. 


Transfer potatoes to a large bowl of cold water. 


Soak potatoes for 1-2 minutes after last batch is added to water.


Drain well in a colander. 


Spread grated potatoes and onions on a kitchen towel and roll up jelly-roll style. 


Twist towel tightly to wring out as much liquid as possible.  
(NOTE:  I did this in two batches.)  


Transfer potato mixture to a bowl and stir in egg and salt.


Seat 1/4 cup oil in 12-inch nonstick skillet over moderately high heat until hot but not smoking.  


Working in batches of 4 latkes, spoon 2 tablespoons potato mixture per latke into skillet, spreading into 3-inch rounds with a spoon.  


Reduce heat to moderate and cook until undersides are browned, about 5 minutes.  


NOTE:  Let the latkes cook well on the first side.  If you flip too soon, they might fall apart on you.  This may have happened to me a few times.


Turn latkes over and cook about 5 minutes mores.    


Transfer to paper towels to drain and season with salt.  


Add more oil to skillet as needed.  


Keep latkes warm on a wire rack set in a shallow baking pan in oven.  


Source:  Epicurious 

Mediterranean Rice

This is pretty much just another rice recipe.  Not super exciting, but still important in its own way.  It has nice lemony flavor that goes nicely with gyros.     


MEDITERRANEAN RICE
  • 2 tablespoons olive oil
  • 1 cup onion (1/2 large onion), diced
  • 2 cloves garlic, minced
  • 2 cups rice (I used Basmati)
  • 4 cups chicken stock
  • 3 teaspoons lemon zest
  • 1/2 teaspoon cumin
  • 1 teaspoon salt
  • 1 teaspoon pepper
  • 1/2 cup parsley, chopped and divided

Cook onion and garlic in olive oil in a medium pan.


Add rice and cook until rice is browned. 


Add chicken stock, lemon zest, cumin, salt, peppper, and 1/4 cup chopped parsley.


Bring to a boil, cover, and cook for 20 minutes. 


Add additional 1/4 cup of parsley. 


Source:  Megan Porter

Monday, December 3, 2012

Corn Chowder

I really only like soup when it is hearty and filling. I'm not a fan of watery, brothy soups. This one is chunky and cozy. You can't go wrong with roasted corn, potatoes, BACON, and (optionally) chicken. Oh, and cilantro, one of my all time favorite ingredients. 


CORN CHOWDER
  • 4 ears fresh corn OR 2 cans corn (15 ounces), see note below
  • 1/2 pound bacon (about 8 slices), diced
  • 1 medium onion, diced
  • 2 cloves garlic, minced
  • 3 Yukon gold potatoes, peeled and diced (about 2 cups)
  • 4 cups chicken stock
  • 6 tablespoons butter
  • 6 tablespoons flour
  • 1 cup heavy cream
  • 2-3 cups shredded chicken meat (optional)
  • 1 1/2 teaspoons salt
  • 1 teaspoon pepper
  • Tobasco sauce, to taste
  • 1/2 cup cilantro, chopped
For Garnish:
  • crumbled bacon
  • chopped cilantro

Roast corn.  Put whole ears of corn, in their husks, into a 350 degree oven for 25 minutes.  Cool briefly, then peel back the husks and cut the kernels off the cobs.  Set aside.


NOTE:  I used canned corn.  To roast the corn, heat 1-2 tablespoons of olive oil on medium heat and add the drained corn.  Stir corn occasionally and cook until browned, about 5 minutes.


Saute bacon.


Transfer 1 tablespoon of bacon fat to a soup pot and cook onions and garlic until transparent. 


Add the corn, bacon, potatoes, and chicken stock and bring to a simmer. 


In a separate pan, melt butter over medium heat. 


Add flour, incorporating with a wire whisk until the mixture is smooth.  Cook 3-4 minutes, stirring.  Let cool slightly. 


Add the butter/flour mixture to the simmering pot.  Stir occasionally to keep from sticking to the bottom of the pan.  Simmer for 20-30 minutes.


Add the cream, chicken, salt, pepper, hot sauce (to taste) and cilantro and simmer for another 10 minutes. 


Garnish with crumbled bacon and chopped cilantro. 


Source:  Modified from Disneyland Resort cookbook

Friday, November 30, 2012

Green Pea Bread

Soooooo good with tikka masala. 


 GREEN PEA BREAD

  • 1/2 cup frozen peas, thawed
  • 1/2 cup lightly packed cilantro leaves and stems
  • 1 cup flour
  • pepper
  • 1 tablespoon oil
  • 1/4 cup (or less) water

In a food processor, mix the peas and cilantro for 30 seconds. 


Add flour, pepper, and oil and mix until well blended. 


With the machine running, add the water and mix until the dough forms into a ball.  You may not need the whole 1/4 cup.  Add just what is needed, otherwise the dough will be too sticky.   


Process the dough for 30 seconds more, turning the machine on and off every 5 seconds. 


Divide the dough into 8 pieces. 


Roll each piece using a rolling pin until thin and flat. 


Cook in 1-2 inches of oil heated to 375 degrees until browned and puffy. 


Source:  Britney Porter

Wednesday, November 28, 2012

Chicken Tikka Masala

I loooooove tikka masala.  I want to try other things when I go to Indian restaurants, but it's hard because I love it so much.  The most I really branch out is that sometimes I get paneer masala instead of chicken.  My two favorite Indian restaurants in the Seattle area are Chutneys and India Gate, in case you're looking for a recommendation. (Kelly--this is specifically for you.)  

My favorite thing about Indian food is dipping naan in the sauce.  But, naan is tricky if you don't have a tandori oven, which I don't.  Luckily my sister-in-law, Britney, discovered a recipe for green pea bread years ago which is the perfect substitution for naan.  Totally different than naan, but totally perfect for dipping in delicious sauce.  Man, I love green pea bread.  So simple, so delicous. I love it.  Recipe to follow very soon.   
 
On to the tikka masala . . .  This recipe was such a pleasant surprise.  This is by far my favorite tikka masala that I've made.  The key ingredient is garam masala.  Garam masala is a blend of spices and includes things like coriander, cumin, pepper, nutmeg, fennel.  This recipes calls for a lot, 3 tablespoons, so head on down to the Market Spice to buy an ounce or two.  This is the only way to buy spices.

I really love this recipe.  Enjoy!


CHICKEN TIKKA MASALA
  • 3-4 chicken breasts
  • Kosher salt
  • ground coriander
  • cumin
  • 1/2 cup plain yogurt
  • 2 tablespoons butter
  • 1 large onion, diced
  • 4 cloves garlic, minced or pressed
  • 1 piece (approximately 2 inches) fresh ginger, peeled and grated
  • 1 tablespoon salt
  • 3 tablespoons garam masala
  • 1 can (28 ounce) diced tomatoes
  • 1 tablespoon sugar
  • 1 1/2 cups heavy cream
  • cilantro
  • 1/4 teaspoon cayenne pepper

Season chicken breasts with Kosher salt, coriander, and cumin on both sides.


Coat chicken breasts completely with plain yogurt and set on a metal cooling rack over a foil lined baking sheet. 


Place about 10-12 inches below a broiler for 5-7 minutes per side. Watch carefully so as not to totally char the chicken. It should have slightly blackened edges. Remove from oven.


In a large skillet, melt 2 tablespoons butter over medium high heat.


Add the onions and sauté until they are slightly browned.


Add garlic, ginger, and 1 tablespoon of salt and cook for a few more minutes. 


Add 3 tablespoons garam masala and stir well. 


Add tomatoes (inlcuding the juices).


NOTE:  I used two 14 ounce cans of tomatoes.  I think I would puree one of the cans next time so that it's a little more saucy.  I'd like it to be both saucy and chunky, if that's a possibility. 


Continue cooking and stirring, scraping the bottom of the pan to deglaze it.


Add 1 tablespoon sugar to cut the acidity.


Add cayenne pepper if you want a little kick.  I'm a spice wimp and 1/4 teaspoon was perfect for me.  Adjust accordingly. 


Simmer on medium for about 5 minutes.


Add in 1 ½ cups of heavy cream.


Chop up your chicken breasts into chunks and stir them into the sauce.


Add a handful of chopped fresh cilantro and stir well.


Serve with green pea bread or naan.  Mmmmmmmm. 


I made this turmeric rice as well, but like it just as much with just plain old rice. 


Source:  Pioneer Woman

Sunday, November 25, 2012

Creamy Peanut Butter Tart

This is what I decided to make for Thanksgiving for dessert:


It was one of the MANY desserts and did not disappoint.  Plus, it was pretty easy.  The peanut butter layer was super smooth and light, plus the ganache on the bottom?  Perfect combo.    


CREAMY PEANUT BUTTER TART
  • 10-12 rectangle graham crackers, crushed into fine crumbs (I needed a few more than just one sleeve)
  • 6 tablespoons butter, melted
  • 3 ounces semisweet chocolate, finely chopped (or chocolate chips)
  • 1 1/2 cups heavy cream, divided
  • 3/4 cup creamy peanut butter
  • 4 ounces cream cheese, softened
  • 1/3 cup sweetened condensed milk
  • whipped cream, for serving (optional) 

In a medium bowl, combine the graham cracker crumbs and the butter.  Mix until combined.


Place the crumbs in a 9-inch tart pan or pie plate.  Press the crumbs evenly over the bottom and up the sides of the pan.


Refrigerate while proceeding with the recipe.


Place the chopped chocolate in a small bowl.


Pour 1/2 cup cream in a small saucepan and heat over medium heat until simmering.


Pour the hot cream over the chopped chocolate and set aside (without stirring) for 3-5 minutes.


Whisk until combined and glossy smooth. Cool the ganache to room temperature by whisking quickly for a few minutes.


Spread the ganache over the bottom of the prepared crust and refrigerate until set, about 20-30 minutes.


Using a handheld mixer, combine the peanut butter, cream cheese and sweetened condensed milk. Blend until smooth.


Add the remaining 1 cup heavy cream and process until the mixture is light and fluffy.


Spoon the mixture over the top of the set ganache layer and smooth to the edges.


Refrigerate for 2 hours or overnight.


Serve with a dollop of whipped cream, if you'd like.  I think everything tastes better with a little, or a lot of, whipped cream.


Source:  Mel's Kitchen Cafe

Tuesday, November 20, 2012

Banoffee Pie

I love this time of year because I have lots of reasons to make dessert.  I'm having fun trying to decide what I'll make for Thanksgiving. 

I made this last week to celebrate a friend's birthday.  I made it in individual glasses which worked well because I didn't need a whole pie.  There are lots of recipes for banoffee pie around the internet.  I'd like to try this one from Mel's Kitchen Cafe sometime soon.

I got this particular recipe from a friend several years ago.  I was very perplexed when she explained to me how to make the dulce de leche:  boil a can of sweetened condensed milk for 3 hours.  I asked her SEVERAL times about not opening the can.  It seemed confusing.  I've made dulce de leche this way many times with success, but read recently that BPA from the can can leach into the sweetened condensed milk, which makes sense.  So, I tried David Lebovitz's method which is the fastest I have found.  You can also cook it in jars in a crock pot, but it takes a while.  So, for banoffee pie, start by making the dulce de leche.  You can do this ahead of time and keep it in the refrigerator. 


BANOFFEE PIE
  • graham cracker crust, recipe found here
  • 2-3 bananas, sliced
  • 1 can (14 ounces) sweetened condensed milk, made into dulce de leche (see below)
  • 2 cups whipping cream, prepared (see below)
  • 1 teaspoon vanilla
  • 3-4 tablespoons sugar
  • milk chocolate, ganache, or good chocolate topping

DULCE DE LECHE

Preheat the oven to 425 degrees.


Pour one can (14 ounces) of sweetened condensed milk (not evaporated milk) into a glass pie plate or shallow baking dish. Stir in a few flecks of sea salt.


Set the pie plate within a larger pan, such as a roasting pan, and add hot water until it reaches halfway up the side of the pie plate.


Cover the pie plate snugly with aluminum foil and bake for 1 to 1¼ hours. (Check a few times during baking and add more water to the roasting pan as necessary).


Once the Dulce de Leche is nicely browned and caramelized, remove from the oven and let cool.


Once cool, whisk until smooth.


Source:  David Lebovitz


WHIPPED CREAM

Pour whipping cream and 1 teaspoon vanilla into bowl.


Use hand or stand mixer to whip the cream. 


Add sugar, 1 tablespoon at a time and mix well until it thickens.


NOTE:  Taste the cream to make sure it is as sweet as you'd like before it gets thick.  It will be grainy if you add the sugar too late. 


ASSEMBLING THE PIE

Place sliced bananas in the bottom of a baked pie shell. 


Drizzle dulce de leche on top of the bananas and spread evenly. 


Top with prepared whipped cream and drizzle chocolate on top.


Lucky for me, I had this Fran's chocolate to use on top.  I love good teacher gifts.


Source:  Karen Linn

Sunday, November 18, 2012

Lime Meringue Tart

This is where I was last week:


Yep, that's Versailles, just outside of PARIS!!  I was lucky to get to go on a last minute trip there last week with my brother and sister-in-law. 

Let's just say, the French know their pastries and baguettes and I sampled my fair share while exploring the city.  My sister-in-law, Britney (who is equally passionate about food) and I started to wonder if we could make anything that came even close.  So, I started reading David Lebovitz's blog (he's an American-living-in-Paris-pro-pastry chef).  Although he's a pro, his recipes are very friendly for the average cook/baker and include lots of helpful tips and explanations.  I love that.  My first attempt was this lime meringue tart that I made for a friendsgiving get together last night.  There are a few adjustments I would make for next time, but overall, I felt like it was a success.  And, the tart dough was SUPER easy, which is a bonus because usually that is the part that really intimidates me.      


LIME MERINGUE TART

  • 8 tablespoons butter, salted or unsalted, cut into pieces
  • 3/4 cup freshly-squeezed lime juice (5-7 limes)
  • 3/4 cups sugar
  • zest of two limes
  • pinch of salt
  • 3 large egg yolks
  • 3 large eggs
  • 2 large egg whites
  • 5 tablespoons sugar
  • pinch of salt
  • a few drops vanilla extract
  • French tart dough (I used this very easy recipe from David Lebovitz's blog.) 

Preheat the oven to 375º.


In a medium-sized saucepan, warm the butter, lime juice, sugar, zest, and salt.


NOTE:  David suggests rolling the limes firmly on the counter before juicing in order to get the most out of them. 


In a separate bowl, whisk together the eggs and the yolks.


When the butter has melted and the mixture is warm, gradually pour some of the warm lime juice mixture into the eggs, whisking constantly.


Pour the warmed eggs back into the saucepan and cook the mixture over low heat.


Stir the mixture constantly over low heat, using the whisk, until the filling thickens and begins to resemble soft jelly. Do not let it boil.


Remove from heat and pour the filling into the pre-baked tart shell.


Bake for 10 minutes.


While the tart is baking, prepare the meringue.  Whip the whites on high speed to soft peaks.


Gradually add the sugar and the salt, while whipping on high speed, until the meringue is shiny and stiff.


Beat in the vanilla, then pipe or spread over the tart.


NOTE:  I beat the meringue a little too long this time which made it firmer than I think it should be.  It didn't pipe onto the tart as nicely as I hoped.  Don't get carried away or distracted while beating the meringue!


Heat the broiler and move the oven rack to the top third of the oven.


Pop the tart under the broiler, watching carefully, as it will brown quickly. When the top begins to darken, remove the tart from the oven and cool completely before slicing.


Storage: The tart is best eaten the day it’s made. You can refrigerate any leftovers. I had a piece for breakfast this morning and it was still very tasty.  If you wish to make the lime filling in advance, you can make it and store it in the refrigerator for up to five days.


Source:  David Lebovitz

Monday, November 12, 2012

Beef Pitas

I've been looking for a recipe for a beef filling for gyro-like pitas that I can make at home. I'm happy I found this recipe and tried it. It was super easy and quick. I was starving when I got home tonight after working out and was able to whip this up pretty quickly. I used hummus in mine, but you could use tzatziki and top with thinly sliced onions if you want. I used store-bought hummus (The one time I made hummus I was not impressed with myself.) and the flat bread from Trader Joe's. I'll definitely make this again.


BEEF PITAS

  • 1/2 large white onion, roughly chopped
  • 2 cloves garlic, smashed
  • 1/2 small bunch fresh parsley
  • 1 pound ground beef
  • 1 small tomato, diced finely
  • 1/4 teaspoon garam masala
  • 2 tablespoons lemon juice
  • Kosher salt

  • pita bread
  • shredded lettuce
  • sliced tomatoes
  • hummus and/or tzatziki


In a food processor, combine the onions, garlic, and parsley until finely minced.


Remove to a large bowl and add in the beef, tomato, garam masala, and lemon juice.


Season with salt.


Mix with your hands until well combined.


Cook meat mixture on medium heat, stirring periodically.


TIP: I drained off the liquid as it cooked out of the meat.


Taste and add salt if needed.


Serve in warm pitas with hummus, shredded lettuce, and tomatoes.


Source: Food Network

Wednesday, October 31, 2012

Chicken Tortilla Soup

Soup season is here!  I make this soup a lot around this time of year.  It is super easy and is especially tasty when served with lots of toppings. 

This soup makes frequent appearances at soup and Scrabble night.  Some friends and I like to get together, especially during the winter months, and eat soup and nerd out playing Scrabble.  Even nerdier?  I own the deluxe edition of Scrabble; the game board swivels on wheels and has convenient recessed game spaces.  Try not to be jealous. 

Tip for Soup:  When making soup, make it the night before and let it sit so the flavors can blend.  It always tastes better the next day.


TORTILLA CHICKEN SOUP
  • olive oil
  • 2-3 cloves of garlic
  • 1 medium onion, chopped
  • 1 can chicken broth (14 ounces)
  • 1 cup water
  • 1 can diced tomatoes (14.5 ounces)
  • 1 can green enchilada sauce (19 ounces)
  • 1 can pinto beans, drained and rinsed (15 ounces)
  • 1 can corn, drained (15 ounces)
  • 1 can diced green chilies (7 ounces)
  • 1 1/2 teaspoons chili powder (use only 1 teaspoon for less spice)
  • 1 1/2 teaspoons cumin
  • 1 1/2 teaspoons Kosher salt
  • 1 1/2 teaspoons pepper
  • 3 chicken breasts, cooked and shredded (or the meat from 1 rotisserie chicken)
  • cilantro, chopped

GARNISH:
  • sour cream
  • cilantro
  • avocado
  • shredded cheese
  • chopped tomatoes
  • tortilla chips

Heat olive oil in a large pot.


Cook garlic and onions on medium heat.


Add chicken broth and water.


Add tomatoes, enchilada sauce, pinto beans, corn, and green chilies and stir well. 


Add spices and stir well.


Add chicken and cilantro.


Bring to a boil and cook for about 20 minutes or until beans are cooked. 


Source:  Megan Porter

Wednesday, October 24, 2012

Toffee Apple Dip

This is the perfect fall treat!  And, it feels a little less bad than the average dessert because you eat it with fresh apple slices.  Right?  I spend a lot of my life justifying my food choices. 


TOFFEE APPLE DIP
  • 8 ounces cream cheese
  • 3/4 cup brown sugar
  • 1/2 cup powdered sugar
  • 1 teaspoon vanilla
  • 1 Heath bar, chopped up

Cream cream cheese, brown sugar, powdered sugar, and vanilla. 


Add chopped up Heath bar.


Chill before serving. 

Sunday, October 21, 2012

Party: Monica's Pre-Wedding Dinner

I like to have a party now and again.  Since a good party includes good food, and that's what this blog is about, I think I will document my parties as well as continue to share my favorite recipes. 

My friend Monica is getting married next week to my friend Adam.  It's fun when two good friends marry each other.  And, since I introduced them, I feel like I can take some credit for this happy occasion that is about to occur.

I hosted a small dinner to celebrate with Monica before her big day with a few of her girlfriends.  I went with a Mexican theme since Monica and I always go to Cactus when we get together.  We always get virgin mojitos and green enchiladas.  I attempted to recreate our tradition and this is how it turned out. 

The Menu:


I made a few tissue flowers for the table and ordered some festive paper fans from Amazon.


Since the guest list was small, I was able to do lots of fun little extras.  Each place setting had a lime placecard, a Mexican bottled soda, a small jar of homemade salsa (from the enchiladas I served), a teeny bottle of Tabasco, and some Hershey's chocolates (Monica's favorite).   


I'm so glad we got a chance to visit with friends and celebrate Monica's upcoming wedding!

CONGRATS, ADAM & MONICA!!  So happy for you guys.   

Friday, October 19, 2012

Chocolate Silk Pie

My mom made this pie growing up.  It was always my Grandpa's favorite.  I recall having it for many breakfasts the day after Thanksgiving.  I rediscovered this treasure a few years back when I was wanting a chocolate pie recipe to serve at book club.  We had read The Help and I thought I was hilarious for serving chocolate pie. 

You can make this in a regular pie crust or in a graham cracker crust, my personal favorite.  It's also fun to make in individual serving glasses.  I did that this last time in little Ikea juice glasses.  Makes for a nice and easy presentation.  Also helps with portion control.   


CHOCOLATE SILK PIE
  • 1 cup butter
  • 1 1/2 cups sugar
  • 3/4 cups cocoa
  • 4 tablespoons vegetable oil
  • 2 teaspoons vanilla
  • 4 eggs

Combine butter, sugar, cocoa, and oil in a mixer and beat for a significant amount of time. 


NOTE:  The sugar will not be dissolved yet.  Don't be alarmed. 


Add vanilla and eggs, one at a time.  Beat well after each egg and scrape the bowl several times.


Mixture will get lighter and fluffier as you continue to beat. 


Put mixture in pie crust and chill.


Serve with whipped cream.


NOTE:  If you're going the route of making individual servings, use this graham cracker crust recipe.  Put a small amount of the graham cracker mixture in the bottom of each glass and use a tart tamper to flatten it out.  No need to bake.  Yields: 10 individual servings   


Source:  Marsha Porter
 

Wednesday, October 17, 2012

Guacamole

This guac is good, good, GOOD!!  The end.   


GUACAMOLE

  • 4 ripe avocados
  • 3 tablespoons freshly squeezed lemon juice (1 lemon)
  • 8 dashes Tabasco sauce
  • 1/2 cup small-diced red onion (1 small onion)
  • 1 large garlic clove, minced
  • 1 teaspoon kosher salt
  • 1 teaspoon freshly ground black pepper
  • 1 medium tomato, seeded, and small-diced

Cut the avocados in half, remove the pits, and scoop the flesh out of their shells into a large bowl.


Use your hands if you want.  


Immediately add the lemon juice, hot sauce, onion, garlic, salt, and pepper and toss well.


Using a knife, slice through the avocados in the bowl until they are finely diced.


Add the tomatoes.


Mix well and taste for salt and pepper.


Source:  Ina Garten

Sunday, October 14, 2012

Roasted Vegetables

This is my favorite way to eat vegetables.  When you roast vegetables, the edges should be crisp and the middles tender.  Roasted broccoli is especially amazing.  In the winter I like to roast carrots and parsnips.  This picture shows broccoli and parsnips.  You can use brussel sprouts, squash, fennel, cauliflower, or whatever tickles your fancy.  The only bummer about roasting vegetables is that they take a solid 15-20 minutes.  But, they're well worth the wait so be sure to plan ahead so you can make it happen!


ROASTED VEGETABLES

  • vegetables, cut in similar-sized pieces
  • olive oil
  • Kosher salt
  • freshly ground pepper
 
Heat oven to 400 degrees. 
 
 
Cut vegetables in similar-sized pieces and place on heavy baking pan in a pile. 
 
 
Drizzle with olive oil and sprinkle with salt and pepper.
 
 
Use hands to toss vegetables, oil, salt, and pepper. 
 
 
Use hands to spread out vegetable pieces on baking sheet. 
 
 
Bake at 400 degrees for 15-20 minutes or until tender. 
 
 
NOTE:  I tried coconut oil this time instead olive oil because I hear it's a little healthier.  I wanted to love it, but didn't.  I feel like that's always the case with me.  Boo. 
     

Wednesday, October 10, 2012

Sweet and Sour Chicken

I've been on a Mel's Kitchen Cafe kick lately.  I love her "Best" section.  Tonight I made her BEST sweet and sour chicken and it did not disappoint.  I definitely had my doubts.  The ingredients seemed too simple.  In fact, you could probably make this on a whim because you'd most likely have everything you need on hand.  I also had doubts as it was cooking because there was a pretty strong vinegar smell.  But, rest assured, the chicken was tender and delicious and everything I hoped it would be! 
 
 
MEL'S SWEET and SOUR CHICKEN
 
  • 3-4 boneless, skinless chicken breasts (I used chicken tenders instead.)
  • salt and pepper
  • 1 cup cornstarch
  • 2 large eggs, beaten
  • 1/4 cup canola oil

     Sauce:
  • 3/4 cup granulated sugar
  • 4 tablespoons ketchup
  • 1/2 cup apple cider vinegar
  • 1 tablespoon soy sauce
  • 1 teaspoon garlic salt

Preheat the oven to 325 degrees F.


Heat the oil in a large skillet over medium heat.


While the oil is heating, cut the chicken breasts into 1-inch pieces.


Season with salt and pepper.


Place the cornstarch in a gallon-sized ziploc bag.


Put the chicken into the bag with the cornstarch and seal, tossing to coat the chicken.


Whisk the eggs together in a shallow dish.


Dip the cornstarch-coated chicken pieces in the egg and place them carefully in a single layer in the hot skillet.


Cook for 1-2 minutes and then flip each piece over to cook on the other side until nicely golden but not all the way cooked through.


Place in a single layer in a baking dish and repeat with the remaining chicken pieces.


Mix the sauce ingredients together in a medium bowl and pour over the chicken in the baking dish.


Bake for one hour, turning the chicken once or twice while cooking to coat evenly with sauce.


Serve over rice.


Source:  Mel's Kitchen Cafe

Tuesday, October 9, 2012

Beef and Broccoli

Mel's Kitchen is a fun food blog I've been reading recently.  She has a section on her blog that identifies what she considers "THE BEST" for different recipes.  This was listed as THE BEST BEEF AND BROCCOLI!  It really was quite tasty.  I will definitely be making it again.  It makes for great leftovers as well.    

 
BEEF and BROCCOLI
Serves 4-5
 
Sauce:
  • 1 tablespoon rice wine vinegar
  • 2 tablespoons chicken broth (or water if you don't have chicken broth)
  • 5 tablespoons oyster sauce
  • 2 tablespoons brown sugar
  • 1 teaspoon toasted sesame oil
  • 2 teaspoons cornstarch

Beef and Broccoli:
  • 3 tablespoons soy sauce
  • 1 1/2 pounds flank steak, cut into 2-inch-wide strips with the grain, then sliced across the grain into 1/8-inch-thick slices

NOTE:  I didn't slice the steak quite right this time around.  The description above seemed a bit confusing.  I think the key is to slice it thinly.  I went back and resliced so I had thin strips. 
 
  • 6 medium cloves garlic, pressed through garlic press or minced (about 2 tablespoons)
  • 1-inch piece fresh ginger, minced (about 1 tablespoon)
  • 1 teaspoon peanut oil or vegetable oil, plus extra for cooking
  • 1 1/4 pounds broccoli, cut into bite-sized pieces
  • 1/3 cup water
  • 3 medium scallions, sliced 1/2-inch thick on diagonal, optional

In a medium bowl, combine beef and soy sauce. Cover with plastic wrap and refrigerate at least 10 minutes or up to 1 hour.


Meanwhile, whisk the sauce ingredients together in a bowl.


In another small bowl, combine garlic, ginger, and 1 teaspoon peanut oil. Set aside.


Heat 1-2 teaspoons peanut oil in 12-inch nonstick skillet over medium-high heat until hot and rippling.


Add half of beef to skillet and break up clumps; cook, without stirring, for 1 minute, then stir and cook until beef is browned around edges and cooked through, about 1-2 minutes. 


NOTE:  Don’t overcook the meat – cook until just barely cooked through so the meat stays tender.


Transfer beef to a medium bowl and cover.


Heat another 1-2 teaspoons peanut oil in the skillet and repeat with remaining beef.


Add 1 tablespoon peanut oil to now-empty skillet; heat until rippling and hot.


Add broccoli and cook 30 seconds; add water, cover pan, and lower heat to medium.


Steam broccoli until tender-crisp, about 2 minutes.


Push the broccoli to the sides of the skillet and add the garlic/ginger mixture.


Cook, mashing the mixture with a spoon, until fragrant, about 15-30 seconds.


Stir the mixture into the broccoli.


Add the beef back to skillet and toss to combine.


Whisk the sauce to recombine and add to the skillet.


Cook, stirring constantly, until sauce is thickened and evenly distributed, about 1-2 minutes.


Sprinkle with scallions and serve with white rice.


Source:  Mel's Kitchen

Wednesday, September 26, 2012

Mac and Cheese

Who doesn't love mac and cheese?!?  Pasta is not typically my thing, but mac and cheese definitely is.  If you're going to eat something super carby, better make sure it's super delicious.  Don't sub out the Gruyere for another kind of cheese; it's key.  Buy it at Trader Joe's so it's not quite so expensive.  Also, I like how pretty the tomatoes look on top.  Also, the bread crumbs give it just a little crunch which is a nice touch.

Warning:  This makes A LOT.  Ina says 6-8 servings, but those would be pretty hefty portions.  I only make this when I know there will be people, other than just me, to eat it.     


MAC and CHEESE
  • Kosher salt
  • 1 pound elbow macaroni
  • 1 quart milk
  • 8 tablespoons (1 stick) unalted butter, divided
  • 1/2 cup flour
  • 12 ounces Gruyere, grated (4 cups)
  • 8 ounces extra-sharp cheddar, grated (2 cups)
  • 1/2 teaspoon freshly ground black pepper
  • 1/2 teaspoon ground nutmeg
  • 3/4 pound fresh tomatoes (4 small)
  • 1 1/2 cups fresh white bread crumbs (5 slices, crusts removed)
Preheat the oven to 375 degrees F.
Drizzle oil into a large pot of boiling salted water.


Add the macaroni and cook according to the directions on the package, 6 to 8 minutes. Drain well.


Meanwhile, heat the milk in a small saucepan, but don't boil it.


Melt 6 tablespoons of butter in a large (4-quart) pot and add the flour.


Cook over low heat for 2 minutes, stirring with a whisk.


While whisking, add the hot milk and cook for a minute or two more, until thickened and smooth.


Off the heat, add the Gruyere, cheddar, 1 tablespoon salt, pepper, and nutmeg.


Add the cooked macaroni and stir well.


Pour into a 3-quart baking dish.


Slice the tomatoes and arrange on top.


Melt the remaining 2 tablespoons of butter, combine them with the fresh bread crumbs, and sprinkle on the top.


Bake for 30 to 35 minutes, or until the sauce is bubbly and the macaroni is browned on the top.


NOTE:  You can make this ahead and wait to add the tomatoes and bread crumbs.  If you're going this route, increase the baking time to 40-50 minutes. 


Source:  Ina Garten, again. 

Friday, September 21, 2012

Creamy Tomatillo Dressing

And now, for the last, but still very important, part of Cafe Rio style meals:  Creamy Tomatillo Dressing! 


CREAMY TOMATILLO DRESSING

  • 3 tomatillos, cut into quarters
  • 1 package ranch buttermilk dressing mix
  • 1/3 cup mayo
  • 1 cup fresh cilantro leaves (leaves, stems, the whole lot)
  • 1-2 cloves garlic, crushed
  • 1/4 teaspoon cayenne pepper (or chili powder for milder flavor)

Combine all ingredients in a blender and mix well. 


Chill in fridge for 1 hour prior to serving. 

Thursday, September 20, 2012

Cafe Rio Sweet Pork

I've mentioned my love of Cafe Rio before.  This probably won't be the last time I talk about it.  I made a modified version tonight which included my three favorite Cafe Rio elements:  cilantro lime rice, creamy tomatillo dressing, and the sweet pork.  We had burrito bowls that went something like this from bottom to top:  rice, black beans, pork, pico de gallo, tomatillo dressing, and cotija cheese.  It was pretty much amazing, if I do say so myself.  These flavors create a taste sensation.  I'm so happy I have leftovers for lunch tomorrow.

Coming soon . . . recipe for creamy tomatillo dressing


CAFE RIO SWEET PORK
 (Serves 12-15 people)
  • 7-8 pounds boneless pork butt or shoulder (use a 3-4 pound roast if you're not making it for a big crowd)
  • 4 cups root beer
  • 4 (8 ounce) cans tomato sauce
  • 4 tablespoons molasses or honey
  • 3 teaspoons minced garlic
  • 2 cups brown sugar
  • 1 teaspoon salt
  • pepper to taste
  • 4 teaspoons cumin

NOTE:  The above makes A LOT of sauce.  If you're using a small roast, half the sauce.  Or, you can freeze the extra.  I did that this last time and it made things a little quicker and easier. 
Salt and pepper the pork and cook in crock pot 8 hours or overnight on low in a small amount of water.
In the morning remove the roast from the crockpot and pull apart with fork, removing fat. (This is not my favorite part, but well worth it in the end.) 
NOTE:  Do not overshred the pork or it will turn mushy. 
Drain all the water from the crockpot. 
Mix rootbeer, tomato sauce, honey, garlic, brown sugar, salt, pepper, and cumin in a bowl and then add it to the crockpot with the shredded pork. 
Cook another 3-4 hours in crockpot on low. (If you don't have this long, an hour or two will do.) 
Serve in a Cafe Rio salad or in burritos or tacos.